Of VNX, Mountain Lions, and Lessons Learned

Mac-OS-X-Mountain-Lion-2It has been a busy week in the tech industry. There were several major conferences including Dell Storage Forum, Cisco Live, and Microsoft TechEd to name a few. Apple also had their annual World Wide Developer Conference (WWDC). While the iOS 6 announcement may have stole the show, Apple also announced MAC OS 10.8 (Mountain Lion).


Now you may remember my post around this time last year when MAC OS 10.7 came out and I was asking everyone to please upgrade. Well I have some good news on this regarding 10.8. I received an email the other day from Drew Schlussel that said that the latest beta had completed it’s testing and things were looking good. This is great news to me and should be encouraging to everyone. Apple can still change things between now and when MAC OS 10.8 goes GA later this summer, and engineering will continue to test against the latest build when it becomes available.


Looking back at last year, the MAC OS changes present a unique challenge to vendors. The low price of adoption for customers make widespread implementation a lot more common. Combine that with the ever increasing movement of Bring-Your-Own-Device in the workplace, and IT departments are losing control over what versions of software and operating systems are in their environment.


With the amount of time it takes for an engineering department to discover a bug, create a fix, perform testing, and publish the new code, we ended up being one of the few that had fixes before the final version of MAC OS 10.7 was available. Once new code is available, it takes time to do an upgrade. Last year, the majority of our upgrades were still being performed by EMC’s Customer Engineers. This additional scheduling time was also compounded by the change control in place at many organizations which are often on a 6 month upgrade cycle at best. This perfect storm can spell disaster when a major issue is discovered.


So what is being done in the future to prevent a repeat problem? Well this year, upgrades on the VNX are pretty much a self-service option at this point. When new code is available, customers can use the Unisphere Service Manager to upgrade their boxes that day. You no longer need to open a ticket and schedule an on-site visit as it can all be done from the comfort of your computer in the office (LAN connection is preferred).


All that is left is your own internal change control process. VNX is currently on a roughly 6 – 8 week service pack release cycle. Armed with this knowledge, you can start filing for your next upgrade just as soon as you apply your current one and you’ll stay right in line with all the enhancements and fixes that come with every upgrade. I am a big proponent of shorter upgrade cycles and I encourage everyone to upgrade their VNX as close as you can to when new code is released.

New code to make your VNX better!

bugfixTo state it right off the bat, this code does not include the features I talked about here and here but this is still a very important update.  Yesterday marked the release of the latest update to the VNX with the general availability of VNX OE File 7.0.53.1 and OE Block 05.31.000.5.720 (both of which are available on the VNX product support page or by using the Unisphere Service Manager (USM) tool.


So you may be asking yourself, if this doesn’t come with all those cool features Sean talked about last week, why should I bother upgrading?  Well I’m glad you asked that question.  In addition to the many bug fixes incorporated in this service pack, this release contains 3 very important updates.


The first is support for the latest VMAX Enginuity code version 5876.82.57 that was released recently as well.  The 2nd enhancement covers those using iSCSI.  Anyone actively using iSCSI on their VNX should read ETA emc291837.  The 3rd and final fix eliminate the erroneous over temperature alerts that were reporting on some power supplies that was previously covered in Primus emc278973.


As with all new code releases, I encourage everyone to upgrade as soon as possible and to not fall too far behind the latest code levels.  I have started a discussion here on ECN incase you have questions about this release and the fixes contained within.

Even MORE goodies coming to VNX

So hopefully most of you read my earlier post about new features coming to VNX.  Well I wanted to write some more about new things coming to VNX.

Flash First!

You may have been reading else where about a change coming to tiering on the the VNX, and I’m here to confirm this rumor.  EMC VNX engineers have reversed the way we do tiering on the VNX.

image

With traditional storage pool with FAST enabled, data would be loaded in and then promoted to the flash storage when it was deemed hot.  Now we are completely reversing that policy.  Since most of your data is only read within the first few days, all new data coming into the VNX will be considered hot.  After a few days of little to no access, the data is demoted down to cheaper & more abundant storage.  This change means that you no longer have to wait to see advantages of FAST as everything will be on your fastest storage right away.  Combining this with the new changes to pools that I talked about before, and you’ve got a 2 pronged approach to getting your data the fastest without breaking the bank.


A new approach to Data Protection

This next goodie isn’t as much a direct enhancement to the VNX as it is an overall solution.  EMC is introducing a new solution called AppSync.  AppSync offers a 1 click protection package for certain virtualized applications you already have stored on the VNX.

image

What you have here is the ability to sync with VMware, Microsoft SQL Server, and Microsoft Exchange with SLA driven protection.image

As you can see from the graphic above, you can have 3 protection packages:

  • GOLD: You get synchronous replication with no data loss
  • SILVER: You get asynchronous replication with minimal data loss.  You may only lose the last few minutes
  • BRONZE: Hourly Snapshots.  You may loose up to an hour of data

image

The 2nd half of this application is the ability to share this out to other admins in your infrastructure.  Currently, if you want to restore something, you need to talk to the storage admin to tell them to roll back the lun.  With AppSync, you can give access to the to the application admins and let them handle the restore.  An exchange admin can now go in and restore a single mailbox without effecting the other users or bothering the storage admin.


This is just Win-Win in my book and I can’t wait to see this in action.  My sources tell me that this will be available as a separate package in the 2nd half of 2012, but that is still subject to change and you should talk to your EMC Sales rep to get a final date of availability.

Get a sneak peek at new VNX features

imageToday marks the first full day of EMC World 2012.  While everyone is busy watching key notes and checking out the hands on labs, I thought I’d offer you a sneak peak at some new VNX features you can look forward to in the 2nd half of 2012.


New Raid Levels for Storage Pools

The first thing I want to talk about is storage pools.  As you are well aware, when you add disks in to storage pool, you need to use the same type of raid level in all storage tiers in the pool.

image


As you can see from the picture above, when creating a typical pool from a RAID 6 configuration, you must use it for your FLASH, your SAS, and your NL-SAS drives.  This means that you must use extra flash drives to fill out your pool.  What is changing in the future is a shift towards towards tier specific raid levels.


image


As you can see in the picture above, now you will be able to have different raid levels at different tiers in your pool.  By mixing a smaller amount of flash with a larger amount of spinning disks, you can put the majority of your unread / archived data on your cheaper storage while being able to afford flash drives as well for your performance data.  This translates into a cheaper initial cost for your storage and offers a more affordable option for customers looking to start out.


What the SNAP!

imageThe next big thing coming to VNX is enhanced block snapshots.  I think everyone is well aware of the limitations of SNAPS of luns on the VNX.  Well I’m proud to announce that those are a thing of the past!  With the new functionality, the VNX has increased the maximum amount of writable SNAPS to 256 per lun.  That also raises the limit to 32,768 per system.  Picture me in my best Boston Accent when I say that is a “wicked” high number of snaps.


Also introduced in this new enhancement is the ability to take SNAPS of a SNAP.  This opens up the possibility for all sorts of new use cases such as Testing and Development options as well as Point-In-Time backups.  This is functionality that has existed on the FILE side for quite some time now and I’m glad to see it’s making it’s way to the lun level as well.


Windows Branch Cache Support for CIFS

imageWith the release of Windows 7 and Windows 2008 R2, Microsoft added new functionality called Branch Cache.  This functionality allows remote computers to cache files and server them out locally to their pears, thus reducing bandwidth over the WAN.  This cached data can either be distributed from clients PCs or be held on a local server in the branch office.  Application performance will be increased by reducing the number of hops the data has to travel.


In the next big release for VNX, we will see added support for this functionality to CIFS shares on the VNX.  For more information on this, please read this Microsoft TechNet Article.


Well that about does it for now.  3 big new features to look forward to in the second half of 2012.  Please feel free to ask a question in the comments section and I’ll try to answer them as best I can.

Making CAVA work with SMB2 on your VNX

vnx-promo-bannerAs more and more people start to deploy a new VNX and switch to an advanced windows server operating system, I am seeing a higher utilization of the SMB2 protocol for cifs.  With this increase, comes new problems.  Recently I had noticed a rather peculiar notification in the server logs in regards to CAVA.  CAVA was reporting the error “FILE_NOT_FOUND” on scans when the file existed.  It would present itself as something like this:


2012-04-29 08:49:47: 81878122528: VC: 3: 32: Server ‘192.168.1.156’ returned error ‘FILE_NOT_FOUND’ when checking file ‘\root_vdm_2\CIFS\Test\1234.exe’


The standard troubleshooting confirmed that the file did exist.  I even back traced it from the CAVA server through the “check$” share and did not have any problems with the file.  So why was CAVA reporting errors like this so often?  It turns out the problem was not with CAVA itself, but with an “enhancement” introduced as part of SMB2.


As part of the SMB2 protocol, the Microsoft Redirector uses a local cache for directory metadata.  This cache is usually cleared after 10 seconds.  What this does, in instances of file systems with a high rate of change, is cause an inconsistency with what the CAVA server sees when it goes to scan a file.  The CAVA server will actually read from the cache and error out when the file is not found in it.  This then causes the error that I pasted above.


Of course with a problem, comes a work around.  This was identified and placed into the latest VNX Event Enabler release notes, but I will provide it for you here:


  1. Open the Windows Registry Editor and navigate to HKLM\SystemCurrentControlSet\Services\LanmanWorkstation\Parameters.
  2. Right-click Parameters and select New > DWORD Value.
  3. For the new REG_DWORD entry, type a name of DirectoryCacheLifetime.
  4. Set the value to 0 to disable DirectoryCacheLifetime.
  5. Click OK.
  6. Restart the machine.


A simple registry change on each CAVA server and a reboot will allow you to set the cache lifetime value to 0 and thus there will be no more caching.  After this change you should not see any more problems caused by SMB2.

Introducing EMC Ask The Expert

AskTheExpertLogoA few months ago Mark Browne approached Matt Brender and I with a new idea for the EMC Community Network.  Mark is very big on ECN and if you’ve visited the site, you’ve probably interacted with things Mark has had a hand in.  So Mark pitched us the idea of starting an “Ask the Expert” section on the support forums.  In this space, we would gather a couple of subject matter experts to answer questions on a related topic for about two weeks at a time and maybe follow up with a video recap.


Matt and I both thought this was a great idea and over the next few months we helped Mark flesh out the idea in preparation to present to the approving management structure.  With the help of our friend Michael Chelotti, we recorded a teaser video.  This video will be very similar to a video recap idea where we will talk about some of the topics during the discussion.  You can watch our video below:


I’m proud to report that this idea was well received and Ask the Expert is a go.  Starting today, we launch our first event!   Matt will be joined by Henri Hamalianen and they will talk about configuring and troubleshooting the VNXe front end connections with VMware.  These two weeks are open for anyone to ask Matt and Henri about using their VNXe in a VMware environment this post on ECN.  I urge everyone to checkout the discussion and get involved.  Keep an eye on the schedule for a discussion on the VNX that may be hosted by yours truly.

Reflections on the Utah Call Center

So my two week stay in Utah has come to a close and it has been a great experience.  Our new recruits are well on their way and they are understanding the inner workings of the VNX a lot faster than I did when I started at EMC.   In the short time I was there I watched them grow from handling simple dial home cases to complex issues and high severity situations.  They work well with each other as well as with customers and I sensed a great deal of comradery amongst the group.  While most of them did work together at a previous employer, they worked well with the other people who were new to them.  There are some clear leaders in the group and you could tell that the other coworkers would gravitate towards them when they needed assistance.


The interaction with the culture of Utah allowed me a greater understanding of how the Mormon religion effects the daily lives of the citizens.  It’s not all that we see on TV shows like “Big Love” and “Sister Wives”.  In fact, polygamy goes against the church’s teachings.  Most of the my new coworkers are in fact Mormon.  Some are more religious than others but they aren’t there to preach to me about their faith.  Some have done their missionary work already and have settled down and started a family, while other aren’t as active with the church.


My stay here allowed me a great deal of freedom to travel and see the sights.  I was able to see what was left of the 2002 Olympic games as well as many geological landmarks and formations.  Coming from the east coast, we don’t get mountains like they do out here and I took every chance I got to enjoy the majestic beauty of them.  If you haven’t already, please check out my photos from my trip on my google+ page.


All in all this was a great trip.  I understand that several of my colleagues will be traveling up to visit Hopkinton, MA soon and I hope to be able to offer them the same experience they offered me here.  I think that great things will come from this new group in Utah and I hope to get out here again soon.

EMC Support: The Next Generation

RemoteHelpIts hard to hide the fact that EMC’s sales are up.  There have been announcements about record profits, growth, and installations all around.  With this increased boom of installed systems, EMC is also increasing it’s support presence as well.  A few months back EMC announced it had broken ground on a new 7 million dollar support facility in Utah.  This center will add at least 500 new US based support engineers to help.


You may be asking what this means to you?  Well in my department (Unified Support) we have added over 60+ new members to our staff.  With the later time zone we can offer extended US based support to our west coast customers instead of doing a hand over at 3 PM Pacific.  This also means there will be more North American based personnel handling cases.


Why am I telling you about this? Well I am happy to announce that I will be traveling to this new center to help mentor the new hires.  I will be able to instill upon them my knowledge of Celerra and VNX.  I will be out there for the first two weeks of November, so if any of my readers are in the area and would like to get together for food or drink, leave me a comment or a shout out on twitter.

Understanding the EMC VNX/Celerra AntiVirus Agent (CAVA): Part 2 – Common Errors

This is part 2 of my CAVA blog post series. In this post, I will go through common error messages you could see in the output of server_viruschk. For those of you haven’t already, please check out part 1 where I go line by line through the output of the server_viruscheck command.


Most of these errors have to do with the account used for CAVA. This account is set as the “Log on as” option for EMC Cava in the “services” section of windows.


OBJECT_NAME_NOT_FOUND:

server_2 :
10 threads started.
1 Checker IP Address(es):
192.168.1.101        OFFLINE at Sat Aug 20 20:28:33 2011 (GMT-00:00)
                     MS-RPC over SMB, CAVA version: , ntStatus: OBJECT_NAME_NOT_FOUND
                     AV Engine:
                     Server Name: cava.thulin.local
                     No signature date


Description: ntStatus: OBJECT_NAME_NOT_FOUND means that the cava service is not running on the server.

Solution: Start the EMC CAVA service under the services menu on the AV server.


ERROR_AUTH 5:

server_2 :
10 threads started.
1 Checker IP Address(es):
192.168.1.101        ERROR_AUTH 5 at Sat Aug 20 21:00:10 2011 (GMT-00:00)
                     MS-RPC over SMB, CAVA version: 4.8.5.0, ntStatus: SUCCESS
                     AV Engine: Symantec AV
                     Server Name: cava.thulin.local
                     Last time signature updated: Tue May 17 05:55:23 2011 (GMT-00:00)
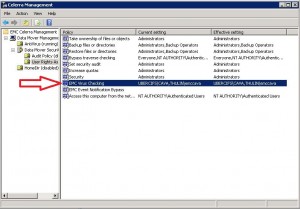

Description: ERROR_AUTH means that when cava when to connect to the “check$” folder on the cifs server, it ran into an error. In this case, ERROR_AUTH 5 means that the account does not have the viruschecking privilege.

Resolution: Check to make sure that the EMC CAVA process is running under the cava network user and not the Local System account. If this is correct, verify that you gave the CAVA network account the Viruschecking Privilege in the MMC snap in.


AV_NOT_FOUND:

server_2 :
10 threads started.
1 Checker IP Address(es):
192.168.1.101        AV_NOT_FOUND at Sat Aug 20 20:29:59 2011 (GMT-00:00)
                     MS-RPC over SMB, CAVA version: 4.8.5.0, ntStatus: SUCCESS
                     AV Engine: Unknown third party antivirus software
                     Server Name: cava.thulin.local
                     Last time signature updated: Tue May 17 05:55:23 2011 (GMT-00:00)


Description: AV_NOT_FOUND means that CAVA cannot find a running AV process. By default, cava uses a privilege called “Debug Program Rights” to search for the following applications running in memory: SpntSvc.exe, rtvscan.exe, Mcshield.exe, InoRT.exe, SWEEPSRV.SYS, SavService.exe, NTRtScan.exe, and kavfs.exe

Solution: First check to make sure your antivirus software is installed and running. If this is true, then make sure the CAVA account has the Debug Program Rights. By default, this privilege is granted to all local administrators, so add the cava account to the local administrators folder.


INVALID_PARAMETER:

server_2 :
10 threads started.
1 Checker IP Address(es):
192.168.1.101        OFFLINE at Sun Aug 21 17:08:28 2011 (GMT-00:00)
                     MS-RPC over SMB, CAVA version: , ntStatus: INVALID_PARAMETER
                     AV Engine:
                     Server Name: cava.thulin.local
                     No signature date


Description: ntStatus is throwing an error trying to connect from the Cifs server to the Cava server. This error is caused when the CIFS server specified for CAVA is not joined to AD.

Resolution: Join the cifs server to AD and restart CAVA.


ERROR_AUTH 64:

server_2 :
10 threads started.
1 Checker IP Address(es):
192.168.1.101        ERROR_AUTH 64 at Sun Aug 21 18:16:05 2011 (GMT-00:00)
                     MS-RPC over SMB, CAVA version: 4.8.5.0, ntStatus: SUCCESS
                     AV Engine: Symantec AV
                     Server Name: cava.thulin.local
                     Last time signature updated: Tue May 17 05:55:23 2011 (GMT-00:00)


Description: ERROR_AUTH 64 is because there is a kerberos skew error.

Resolution: Make sure the time on the cava server is within 5 minutes of the data mover.


ERROR_AUTH 86:

server_2 :
10 threads started.
1 Checker IP Address(es):
192.168.1.101        ERROR_AUTH 86 at Sun Aug 21 17:25:31 2011 (GMT-00:00)
                     MS-RPC over SMB, CAVA version: 4.8.5.0, ntStatus: SUCCESS
                     AV Engine: Symantec AV
                     Server Name: cava.thulin.local
                     Last time signature updated: Tue May 17 05:55:23 2011 (GMT-00:00)

Problem: ERROR_AUTH 86 is caused when someone changes the password of the CAVA user in AD, but the cava software is using the old password.

Resolution: Update the password used for the cava account on each cava server. If you attempt to restart cava without updating, cava will fail to start with a logon failure error.


ERROR_AUTH 1265:

server_2 :
10 threads started.
1 Checker IP Address(es):
192.168.1.101        ERROR_AUTH 1265 at Sun Aug 21 16:04:33 2011 (GMT-00:00)
                     MS-RPC over SMB, CAVA version: 4.8.5.0, ntStatus: SUCCESS
                     AV Engine: Symantec AV
                     Server Name: cava.thulin.local
                     Last time signature updated: Tue May 17 05:55:23 2011 (GMT-00:00)

Description: ERROR_AUTH 1265 is caused when the cava user account has expired in AD. You can verify this if you attempt to login to a remote desktop with the cava user’s credentials.

Resolution: Have a domain admin reset the CAVA account and change it to never expire to keep this problem from returning.


ERROR_AUTH 1326:

server_2 :
10 threads started.
1 Checker IP Address(es):
192.168.1.101        ERROR_AUTH 1326 at Sun Aug 21 17:49:37 2011 (GMT-00:00)
                     MS-RPC over SMB, CAVA version: 4.8.5.0, ntStatus: SUCCESS
                     AV Engine: Symantec AV
                     Server Name: cava.thulin.local
                     Last time signature updated: Tue May 17 05:55:23 2011 (GMT-00:00)

Description: ERROR_AUTH 1326 occurs when the cava user’s password has expired in AD.

Resolution: Change the cava account password and have a domain admin set it to never expire.


ERROR_AUTH 1331:

server_2 :
10 threads started.
1 Checker IP Address(es):
192.168.1.101        ERROR_AUTH 1331 at Sun Aug 21 17:09:45 2011 (GMT-00:00)
                     MS-RPC over SMB, CAVA version: 4.8.5.0, ntStatus: SUCCESS
                     AV Engine: Symantec AV
                     Server Name: cava.thulin.local
                     Last time signature updated: Tue May 17 05:55:23 2011 (GMT-00:00)

Description: ERROR_AUTH 1331 is when the cava account object is disabled or logon hours have been put in place to deny logon.

Resolution: Have a domain admin enable the cava account object in AD and confirm that the cava account can logon at all hours of the day.


ERROR_AUTH 1909:

server_2 :
10 threads started.
1 Checker IP Address(es):
192.168.1.101        ERROR_AUTH 1909 at Sun Aug 21 17:57:17 2011 (GMT-00:00)
                     MS-RPC over SMB, CAVA version: 4.8.5.0, ntStatus: SUCCESS
                     AV Engine: Symantec AV
                     Server Name: cava.thulin.local
                     Last time signature updated: Tue May 17 05:55:23 2011 (GMT-00:00)

Description: ERROR_AUTH 1909 occurs when the cava user account has been locked out due to too many invalid logon attempts.

Resolution: Have an AD admin reset the lockout status on the cava network user.


This should cover most of the common errors you will find when cava is running. You may have to check the server logs on cava to see them in the event that cava is turned off. If you have experienced a problem and my resolution does not fix it, please let me know and also open a case with EMC Celerra support.
 
On a side note, I want to also recognize Daniel Morris for his blog posts on CAVA. I urge you to read the following links to get a good understanding as well.

http://blog.planetchopstick.com/2010/10/18/what-is-emc-cava-celerra-anti-virus-agent/

http://blog.planetchopstick.com/2011/05/03/cava-considerations-and-basic-setup/

http://blog.planetchopstick.com/2011/05/05/cava-troubleshooting/

Configuring LDAP Authentication for Unisphere on the VNX

Whether you are configuring security for corporate compliance, or you want a central repository to manage user access, LDAP integration is becoming a major part of corporate infrastructure. Many of you may not realize this, but the VNX (as well as the older Clariion and Celerra) support LDAP integration, and after reading this blog post you will to. During this post I will cover the different steps (with pictures) required to set up LDAP authentication for VNX for FILE, BLOCK, and Unified.


*UPDATE*  With the release of FILE OE 7.1 and BLOCK OE 5.32, All LDAP settings are now done in the Storage Domain section of Unisphere.  Just follow the directions here to setup LDAP.


To start this process we will need a few things:

  1. The IPs of two domain controllers
  2. The “distinguished name” and password of a service account that can do an LDAP lookup
  3. The name of an active directory group you want to give admin access to (no spaces pleas)
  4. An existing administrator account on the VNX (and the root password for FILE)


Before we begin, you may want to login to the control station CLI as root and run the following command: “/nas/sbin/cst_setup –reset”. This command will regenerate the control station lockbox fingerprint and is usually required on systems where you may have changed the IP or name of the control station. I find it’s best to get this out of the way early instead of proceeding with configuration and finding it needs to be done later since this does not change any settings outside of the scope of this tutorial. More information on this can be found in Primus EMC260883.


Configuring LDAP on VNX for FILE


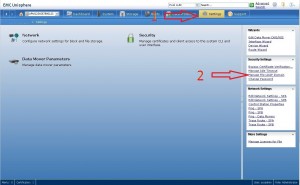
To start, we will need to login with an administrator account such as nasadmin/systadmin. You will start by clicking on the “settings” tab. On the right hand side you will see link to “Manage File LDAP Domain”, click it.

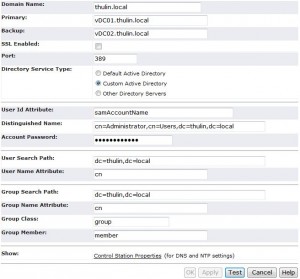
This section has several entries and is where we configure all the domain information. I have broken this down line by line as well as included a picture.


  1. Domain Name:
    • In this area you will put in the domain name. For this example, I used my domain “thulin.local”
  2.  Primary:
    • This is where you put in the IP address of the first domain controller
  3. Backup:
    •  This is where you put in the IP address of the second domain controller
  4. SSL Enabled:
    • Are you using SSL? If so, click the box. For this example I am not because I don’t have a certificate authority setup in the lab
  5. Port:
    • 389 for LDAP and 636 if your using LDAPS
  6. Directory Service Type:
    • Here you get 3 options (default, custom, and other). Default takes most of the guess work out, but will only work if the service account and all the users and groups exist in the “users” container. The custom option allows you to specify the exact container for the service accounts and the user and group search path. Other is used for non active directory setups (such as OpenLDAP servers). For this example we are using the custom option
  7. User Id Attribute:
    • This is the attribute that represents a user in LDAP, in 99% of Active Directory environments it is “samAccountName” and we will leave it as that here
  8. Distinguished Name:
    • This is where you put the distinguished name of the service account. For this example I just used the administrator account
  9. Account Password:
    • If this needs explaining then I have a nice etch-a-sketch you should be using instead of a VNX.
  10. User Search Path:
    • This is where you specify the path to search for users who will be logging in. If the user is not inside this path, they will not be granted access. I like to search the whole domain because a user cannot exist in more than one spot, and authentication won’t be effected by moving a user inside active directory
  11. User Name Attribute:
    • This is the attribute to search by, we will use “cn” (aka Common Name)
  12. Group Search Path:
    • This is just like above, but for groups instead. The same restrictions apply as well
  13. Group Name Attribute:
    • Again we want to search by the common name
  14. Group Class:
    • You want to search for the “group” class
  15. Group Member:
    • We are searching for a “member” of a group


Once all the information has been populated, hit apply to save it (if you run into an error here, see the statement I made in paragraph 2 and start over). Once this is done we will need to test things, so hit the test button. If everything worked correctly it will say “Test Domain Settings. OK”. If you get “Bind Failed” error, either your IP, Distinguished Name, or password is incorrect. If you get a user or group error, check the search path and try again.


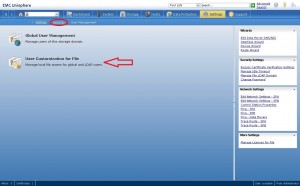
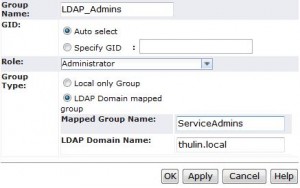
Now that we have configured our authentication protocol, we need to assign a privilege to an AD group. This is done in the in the user management area, so go back to the settings tab, then click on security, then click on user management, and finally “User Customization for File”. This area will present you with 3 tabs: Users, Groups, and Roles. Click on groups and then click create at the bottom. You will now be presented with a screen to make a new group and map it to LDAP.


  1. Group Name:
    • This is a local name for the group. You can call it whatever you want because it ONLY exists on the VNX FILE control station. I chose the name LDAP_Admins
  2. GID:
    • This is where you can specify a GID or just have the system auto select one. I use the default of auto select
  3. Role:
    • This is where you give permissions to the group based on the role. Any user in this group will be given this role/permission level by default. For this example, I chose to give the users the Administrator role.
  4. Group Type:
    1. This is where you would select “LDAP group mapped” and put in the name of the group (in this case serviceAdmins) and the domain name (thulin.local). The group name can’t have any spaces but does support underscores.


At this point all the work on the VNX FILE side is done and it’s time to start on the BLOCK side.


Configuring LDAP on VNX for BLOCK


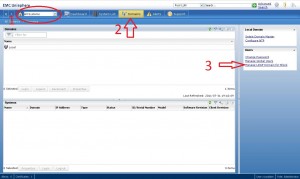
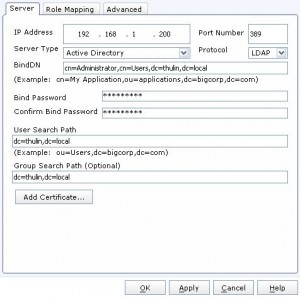
Setting up LDAP for Block is very similar to the way it was done on the Clariions. Just like with the File side, you will need the same 4 bits of information. To begin, click on the home button in the upper left, then click on the domain tab, and finally click on “Manage LDAP Domain for Block”. This will bring up a window where we can start configuring our LDAP settings. The block side requires you to setup individual domain controllers, and set all the settings on that one server, so click on the “add” button and we’ll get started. You will see several areas to input information and I will go through them:


  1. IP Address
    • This is where you put in the IP of the domain controller
  2. Port
    • 389 for LDAP, 636 for LDAPS
  3. Server Type
    • There are two options: LDAP Server and Active Directory. Make sure to choose “Active Directory” if you’re using an AD environment (most of you will be doing this)
  4. Protocol
    • LDAP or LDAPS
  5. BindDN
    • This is where you put in the Distinguished Name of the service account just like when setting it up for file.
  6. Bind Password
    • Password for the service account
  7. Confirm Bind Password
    • Make sure it matches
  8. User Search Path
    • Just like with File, this is where you would set the search scope to find your users
  9. Group Search Path
    • Just like with File, This is where you set the search scope to find your groups
  10. Add certificate
    • This is where you would upload a root CA certificate for LDAPS. Make sure it’s in base64 encoding


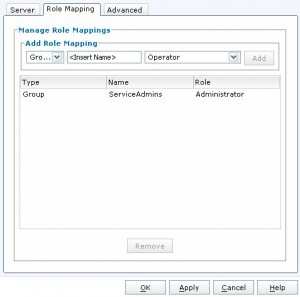
After you have put in all this information, click on the “Role Mapping” tab so we can map an AD group. Once in there you will want to select “Group” from the first pull down. Put in the name of the AD group (in this example I used “ServiceAdmins”), then select the Role from the second pull down (in this case I selected Administrator), and finally click “Add” to add the mapping. Once you have all your mappings, click ok and wait for the confirmation message. Then you want to do this all over again for the second domain controller. Once you have this all set, click “Synchronize”. And that is it!


Configuring LDAP on VNX for UNIFIED


Configuring LDAP for a unified box is no different than the Block and File side.  The only thing you need to remember is that you need to do both, because the authentication will check your LDAP account against both the control station and the service processor.  Both configurations will have to be working correctly to login properly.


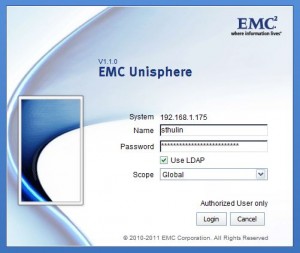
Now it is time to test your LDAP login. Logout of Unisphere by clicking the door icon in the upper right. Open Unisphere again and this time put in your AD username and password. Be sure to select “Use LDAP” and click on “Login”. If all your configuration is correct, you will be brought back in to Unisphere. If you get an access denied message, check you username, password, as well as your user and group search paths.

*UPDATE*

I have included a youtube video published by EMC that shows exactly what I have demonstrated above.

I hope you enjoyed this tutorial and I hope this is the first of many. If you have any questions on what you’ve just seen, or if you have any suggestions for future write-ups, drop a message in the comments below.